


Photoshop and other graphics packages support custom image filters. By specifying a small table of numbers, many simple effects can be achieved. Depending on the graphics application, the filter dialog should look something like this.
|
| The custom filter dialog (Photoshop) |
The dialog consists of a table of 25 weights, a scale value, and an offset value. These values are all integers. Fractional numbers (e.g. 2.5) are not allowed.
The filter visits each pixel in the image sequentially, and for each pixel, a filtering formula is applied. The current pixel in the process is represented by the middle box in the table. The box immediately to the right represents the pixel immediately to the right of the current pixel. The box below center represents the pixel below the current pixel, and so on. Each one of these boxes has a number value indicating a weight. If the box is empty a weight of zero is assumed (which means it's not used in the calculation).
The current pixel and its 24 neighbors are multiplied by their corresponding weights, and these products are then added together. This value is divided by the "scale" value, and finally the "offset" is added at the end. This value is the result of the filter, and it is done separately for each channel in the image (e.g. red, green, and blue) and for each pixel in the image. The results of the filter are stored in a separate image buffer until the process is complete, so the pixel values used in the calculation are always from the original image, never from previously filtered pixels. In other words, there is no "feedback" in the filtering process.
Consider the following example filter:
|
resultx,y = ( (weight3,3 × pixelx,y) + (weight4,4 × pixelx+1,y+1) ) / scale + offset resultx,y = ( (1 × pixelx,y) + (−1 × pixelx+1,y+1) ) / 1 + 128 resultx,y = pixelx,y − pixelx+1,y+1 + 128 |
You can read this formula as, the filtered pixel at the coordinates (x,y) is the value of the original pixel at (x,y) minus the value of the original pixel at (x-1, y-1) plus 128. The unfilled parts of the table are not included in the calculation. For the mathematically inclined, the general equation for a custom filter can be expressed in the following form.
|
| Custom filter formula |
where i is each column of the filter table and j is each row. The weighti,j is the value entered in the table at cell (i,j).
Even if the math seems daunting, it's worth playing around with different values to get a feel for how it works. Here are a few general rules for creating a custom filter that doesn't just produce a mess. These are only guidelines, so feel free to bend the rules.
- The scale should usually be equal to the sum of all the weights.
- If the sum of the weights divided by the scale is 1, then the offset should be 0.
- If the sum of the weights is 0 then the offset should be 128.
- If the sum of the weights divided by the scale is −1 then the offset should be 255. The image will be inverted from what it would be if the sum were +1.
- The sum of the weights divided by the scale should generally not be more than +1 or less than −1. Otherwise the image will come out very dark or very bright.
- The scale can't be less than 1 (you can't divide by zero).
- If the filtered image is very dark, the scale is probably too high. If it's very light, the scale is probably too low.
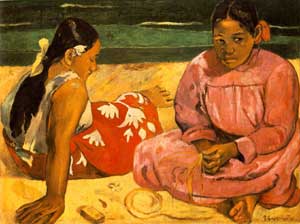
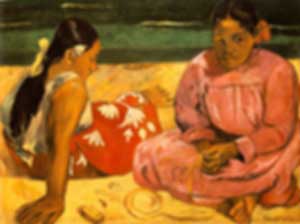
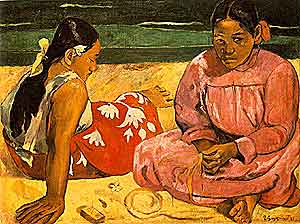
Lastly, here are a few examples of working custom filters and a sample image showing what the effect looks like.
|
Original image. This filter is the trivial
case, only using the value of the middle pixel.
|
|||||||||||||||||||||||||
|
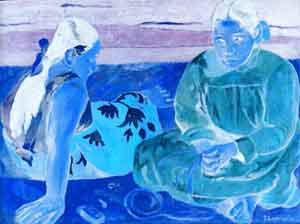
Gaussian blur. Averages all the nearby pixels, giving more
weight to those in the middle. A regular, non-Gaussian blur would
have all the values set to 1. Note the scale is set to 35, which
is the sum of all the weights.
|
|||||||||||||||||||||||||
|
Sharpen. The result is stronger if the immediately neighboring
pixels are different, thus emphasizing edges. The middle value is 5 so
that the sum of the weights is 1.
|
|||||||||||||||||||||||||
|
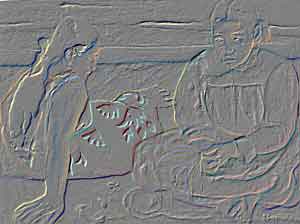
Emboss. Using the same principle as sharpen, but in only one
direction (diagonally). The sum of the weights is 0, so there will be
both negative and positive values. Adding 128 (halfway between 0 and
255) returns the result to the normal range of 0–255.
|
|||||||||||||||||||||||||
|
Invert. The negative weight will produce negative values from
−255 to 0. Adding an offset of 255 normalizes the values to
0–255. The result is a photonegative image.
|
Sample image: "Femmes de Tahiti [Sur la plage] (Tahitian Women [On the Beach])," painted by Eugène-Henri Paul Gauguin in 1891.